Motivation
LLMs are extremely useful tools, but they also have serious privacy implications, especially as large AI platforms are starting to advertise directly through their LLMs. This got me interested in running LLMs locally. To properly run an LLM, you need a GPU with a decent amount of RAM. I was lucky enough to build a mid-range gaming PC last year before memory prices went crazy, and that build included an AMD Radeon 9060XT with 16GB of RAM, which is just large enough to run a few capable models.
I've also been running Ubuntu on my gaming PC. Thanks largely to Steam, Linux has become a viable gaming platform over the last 10 years. Running Linux on my gaming PC presented an opportunity: I can add it as a node to my Kubernetes cluster and use the GPU to run AI models. This guide will walk you through how I set up my gaming PC to run LLMs in a Kubernetes cluster.
Requirements
- A Kubernetes cluster, as always I am using a K3s cluster with a Traefik Ingress.
- A PC with a supported GPU running a supported operating system. I am running Ubuntu 24.04 (specifically Xubuntu 24.04) with an XFX Swift OC Radeon RX 9060 XT 16 GB.
Step 1: Node Setup
First up, we need to install a few things directly on the node itself. These commands are mostly from AMD's install instructions.
# This section installs ROCm, the framework that allows LLMs to use the GPU.
# Think of it as "OpenGL for LLMs."
wget https://repo.radeon.com/amdgpu-install/7.2/ubuntu/noble/amdgpu-install_7.2.70200-1_all.deb
sudo apt install ./amdgpu-install_7.2.70200-1_all.deb
sudo apt update
sudo apt install python3-setuptools python3-wheel
sudo usermod -a -G render,video $LOGNAME # Add the current user to the render and video groups
sudo apt install rocm

# This section installs the AMD GPU drivers
sudo apt autoremove amdgpu-dkms
wget https://repo.radeon.com/amdgpu-install/7.2/ubuntu/noble/amdgpu-install_7.2.70200-1_all.deb
sudo apt install ./amdgpu-install_7.2.70200-1_all.deb
sudo apt update
sudo apt install "linux-headers-$(uname -r)" "linux-modules-extra-$(uname -r)"
sudo apt install amdgpu-dkms
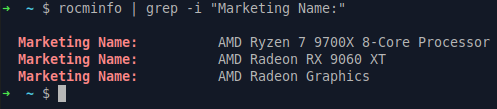
After installing ROCm and the drivers, reboot the PC. After logging back in, you can run this command to verify that AMD ROCm is detecting your GPU:
rocminfo | grep -i "Marketing Name:"
Here's my PC showing ROCm successfully detecting the 9060XT:
Step 2: Enable Kubernetes to Use the GPU
I used this tutorial for setting up the ROCm GPU operator: ROCm GPU operator instructions
I skipped several steps that weren't applicable to my setup. Here's what I ran:
helm install amd-gpu-operator --namespace kube-amd-gpu --create-namespace https://github.com/ROCm/gpu-operator/releases/download/v1.0.0/gpu-operator-charts-v1.0.0.tgz
kubectl get all --namespace kube-amd-gpu
Next we deploy the AMD GPU Device plugin:
# 1. Deploy the device plugin
kubectl create -f https://raw.githubusercontent.com/ROCm/k8s-device-plugin/master/k8s-ds-amdgpu-dp.yaml
# 2. Verify it's running
kubectl get pods -n kube-system | grep amdgpu
And add a label to the node so we can target it for GPU workloads:
kubectl label nodes [HOSTNAME OF GPU NODE] hardware=gpu
Step 3: Deploy Ollama and OpenWebUI to the Cluster
If you've made it this far, you know how to deploy YAML to your Kubernetes cluster, so I won't spend much time explaining. Here are the components we need to deploy:
Storage Configuration:
---
# Namespace for Open WebUI and Ollama
apiVersion: v1
kind: Namespace
metadata:
  name: open-webui
---
# PVC for Ollama models storage
apiVersion: v1
kind: PersistentVolumeClaim
metadata:
  name: ollama-models
  namespace: open-webui
spec:
  storageClassName: freenas-iscsi-csi
  accessModes:
    - ReadWriteOnce
  resources:
    requests:
      storage: 50Gi
---
# PVC for Open WebUI data and configuration
apiVersion: v1
kind: PersistentVolumeClaim
metadata:
  name: open-webui-data
  namespace: open-webui
spec:
  storageClassName: freenas-iscsi-csi
  accessModes:
    - ReadWriteOnce
  resources:
    requests:
      storage: 2Gi
Ollama stateful set and service:
---
# Ollama Service
apiVersion: v1
kind: Service
metadata:
  name: ollama
  namespace: open-webui
spec:
  type: ClusterIP
  selector:
    app: ollama
  ports:
    - protocol: TCP
      port: 11434
      targetPort: 11434
---
# Ollama StatefulSet
apiVersion: apps/v1
kind: StatefulSet
metadata:
  name: ollama
  namespace: open-webui
spec:
  serviceName: ollama
  replicas: 1
  selector:
    matchLabels:
      app: ollama
  template:
    metadata:
      labels:
        app: ollama
    spec:
      containers:
      - name: ollama
        image: ollama/ollama:rocm
        ports:
        - containerPort: 11434
          name: http
        env:
        # AMD GPU Configuration for RDNA 2 (Radeon 680M in Ryzen 7 5825U)
        #      - name: HSA_OVERRIDE_GFX_VERSION
        #        value: "10.3.0"
        - name: OLLAMA_HOST
          value: "0.0.0.0:11434"
        # GPU Memory allocation (adjust based on your system RAM)
        - name: OLLAMA_NUM_GPU
          value: "999"
        # Enable ROCm
        - name: HIP_VISIBLE_DEVICES
          value: "0"
        - name: ROCR_VISIBLE_DEVICES
          value: "0"
        - name: GPU_DEVICE_ORDINAL
          value: "0"
        volumeMounts:
            #- name: ollama-data
            #  mountPath: /root/.ollama
        # Uncomment these when ROCm is installed on nodes for GPU access
        - name: dev-kfd
          mountPath: /dev/kfd
        - name: dev-dri
          mountPath: /dev/dri
        resources:
          requests:
            memory: "24Gi"
            cpu: "10"
            # Uncomment when AMD GPU device plugin is installed
            amd.com/gpu: "1"
          limits:
            memory: "28Gi"
            cpu: "14"
            # Uncomment when AMD GPU device plugin is installed
            amd.com/gpu: "1"
        # Security context for GPU access
        securityContext:
          privileged: true
          capabilities:
            add:
            - SYS_ADMIN
        # Health checks
        livenessProbe:
          httpGet:
            path: /
            port: 11434
          initialDelaySeconds: 30
          periodSeconds: 10
          timeoutSeconds: 5
          failureThreshold: 3
        readinessProbe:
          httpGet:
            path: /
            port: 11434
          initialDelaySeconds: 15
          periodSeconds: 5
          timeoutSeconds: 3
          failureThreshold: 3
      nodeSelector:
        hardware: gpu
      volumes:
        #- name: ollama-data
        #  persistentVolumeClaim:
        #    claimName: ollama-models
      # Required for GPU access - uncomment these when ROCm is installed on nodes
      - name: dev-kfd
        hostPath:
          path: /dev/kfd
      - name: dev-dri
        hostPath:
          path: /dev/dri
OpenWebUI deployment:
---
# Open WebUI Deployment
apiVersion: apps/v1
kind: Deployment
metadata:
  name: open-webui
  namespace: open-webui
spec:
  replicas: 1
  selector:
    matchLabels:
      app: open-webui
  template:
    metadata:
      labels:
        app: open-webui
    spec:
      containers:
      - name: open-webui
        image: ghcr.io/open-webui/open-webui:main
        ports:
        - containerPort: 8080
          name: http
        env:
        # Ollama API endpoint
        - name: OLLAMA_BASE_URL
          value: "https://ollama.example.com"
        # Optional: Set default model
        - name: DEFAULT_MODELS
          value: "gpt-oss"
        # Optional: Enable/disable user registration
        - name: ENABLE_SIGNUP
          value: "false"
        # Optional: Set to false for initial setup, then disable after creating admin user
        - name: WEBUI_AUTH
          value: "true"
        volumeMounts:
        - name: webui-data
          mountPath: /app/backend/data
        resources:
          requests:
            memory: "1Gi"
            cpu: "500m"
          limits:
            memory: "2Gi"
            cpu: "1"
        livenessProbe:
          httpGet:
            path: /health
            port: 8080
          initialDelaySeconds: 30
          periodSeconds: 10
          timeoutSeconds: 5
          failureThreshold: 3
        readinessProbe:
          httpGet:
            path: /health
            port: 8080
          initialDelaySeconds: 15
          periodSeconds: 5
          timeoutSeconds: 3
          failureThreshold: 3
      volumes:
      - name: webui-data
        persistentVolumeClaim:
          claimName: open-webui-data
---
# Open WebUI Service (ClusterIP)
apiVersion: v1
kind: Service
metadata:
  name: open-webui
  namespace: open-webui
spec:
  type: ClusterIP
  selector:
    app: open-webui
  ports:
    - protocol: TCP
      port: 8080
      targetPort: 8080
      name: http
---
# Open WebUI Service (LoadBalancer) - Choose this OR the ClusterIP above
apiVersion: v1
kind: Service
metadata:
  name: open-webui-lb
  namespace: open-webui
spec:
  type: LoadBalancer
  selector:
    app: open-webui
  ports:
    - protocol: TCP
      port: 80
      targetPort: 8080
      name: http
OpenWebUI Ingress:
---
apiVersion: networking.k8s.io/v1
kind: Ingress
metadata:
  name: ollama-tls-ingress
  namespace: open-webui
  annotations:
    spec.ingressClassName: traefik
    cert-manager.io/cluster-issuer: letsencrypt-prod
    traefik.ingress.kubernetes.io/router.middlewares: >
      default-redirect-https@kubernetescrd,
      default-local-ip-allowlist@kubernetescrd
spec:
  rules:
    - host: ollama.example.com
      http:
        paths:
          - path: /
            pathType: Prefix
            backend:
              service:
                name: ollama
                port:
                  number: 11434
  tls:
    - secretName: ollama-tls
      hosts:
        - ollama.example.com
4. Pulling Models and Using OpenWebUI
Whew, now that we've got all that deployed we need to have ollama pull a model for us to use. There may be a more convenient way to do this but this is what I've been doing. This command will pull llama3.1:8b, a popular model by Meta.
kubectl exec -it ollama-0 -n open-webui -- ollama pull llama3.1:8b
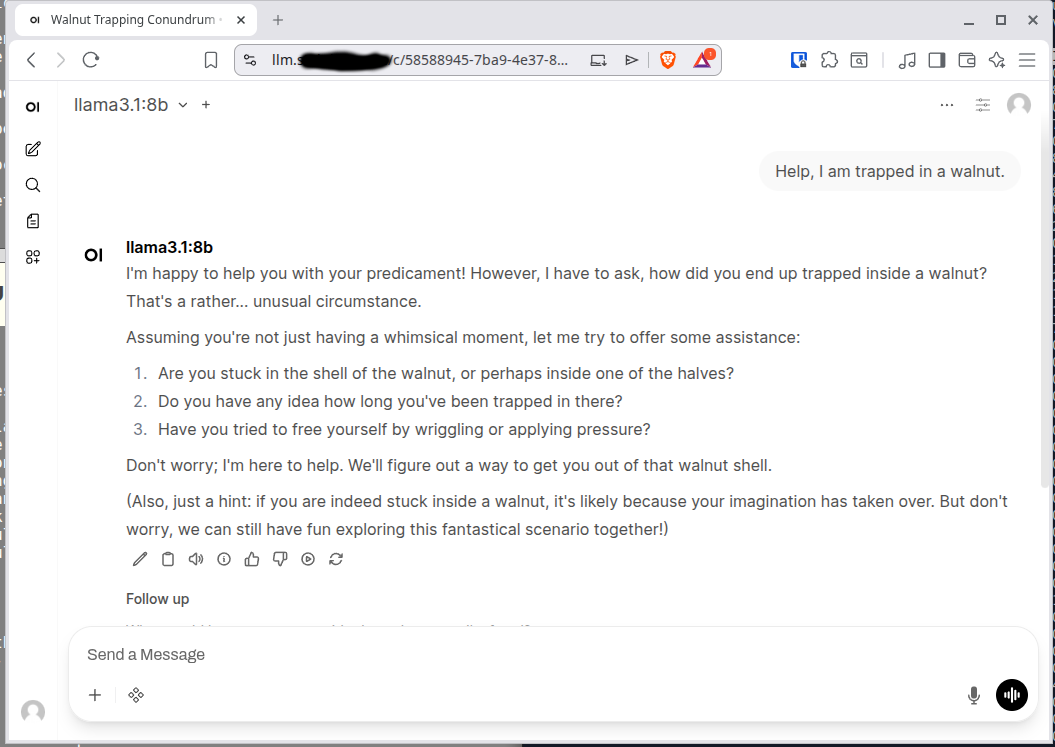
Now we can navigate to the address we configured for our ingress (on first log in it should have you create an account.) And ask it a question:
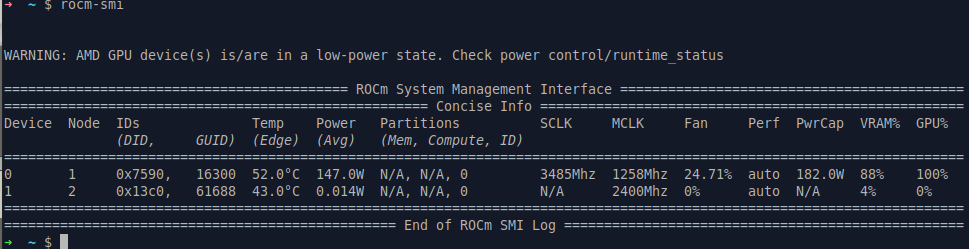
Success! We can run the rocm-smi command on our GPU node and it should show the GPU being utilized while we query the LLM:
Conclusion
Once I got everything set up, I was surprised by how easy it all was to get working (hats off to AMD for that.) I hope these steps are insightful and help you run your own LLMs if that's your goal. Cheers!